
Black Forest Yule Stump Cake with Chocolate Pinecone Truffles {Bakeolution}
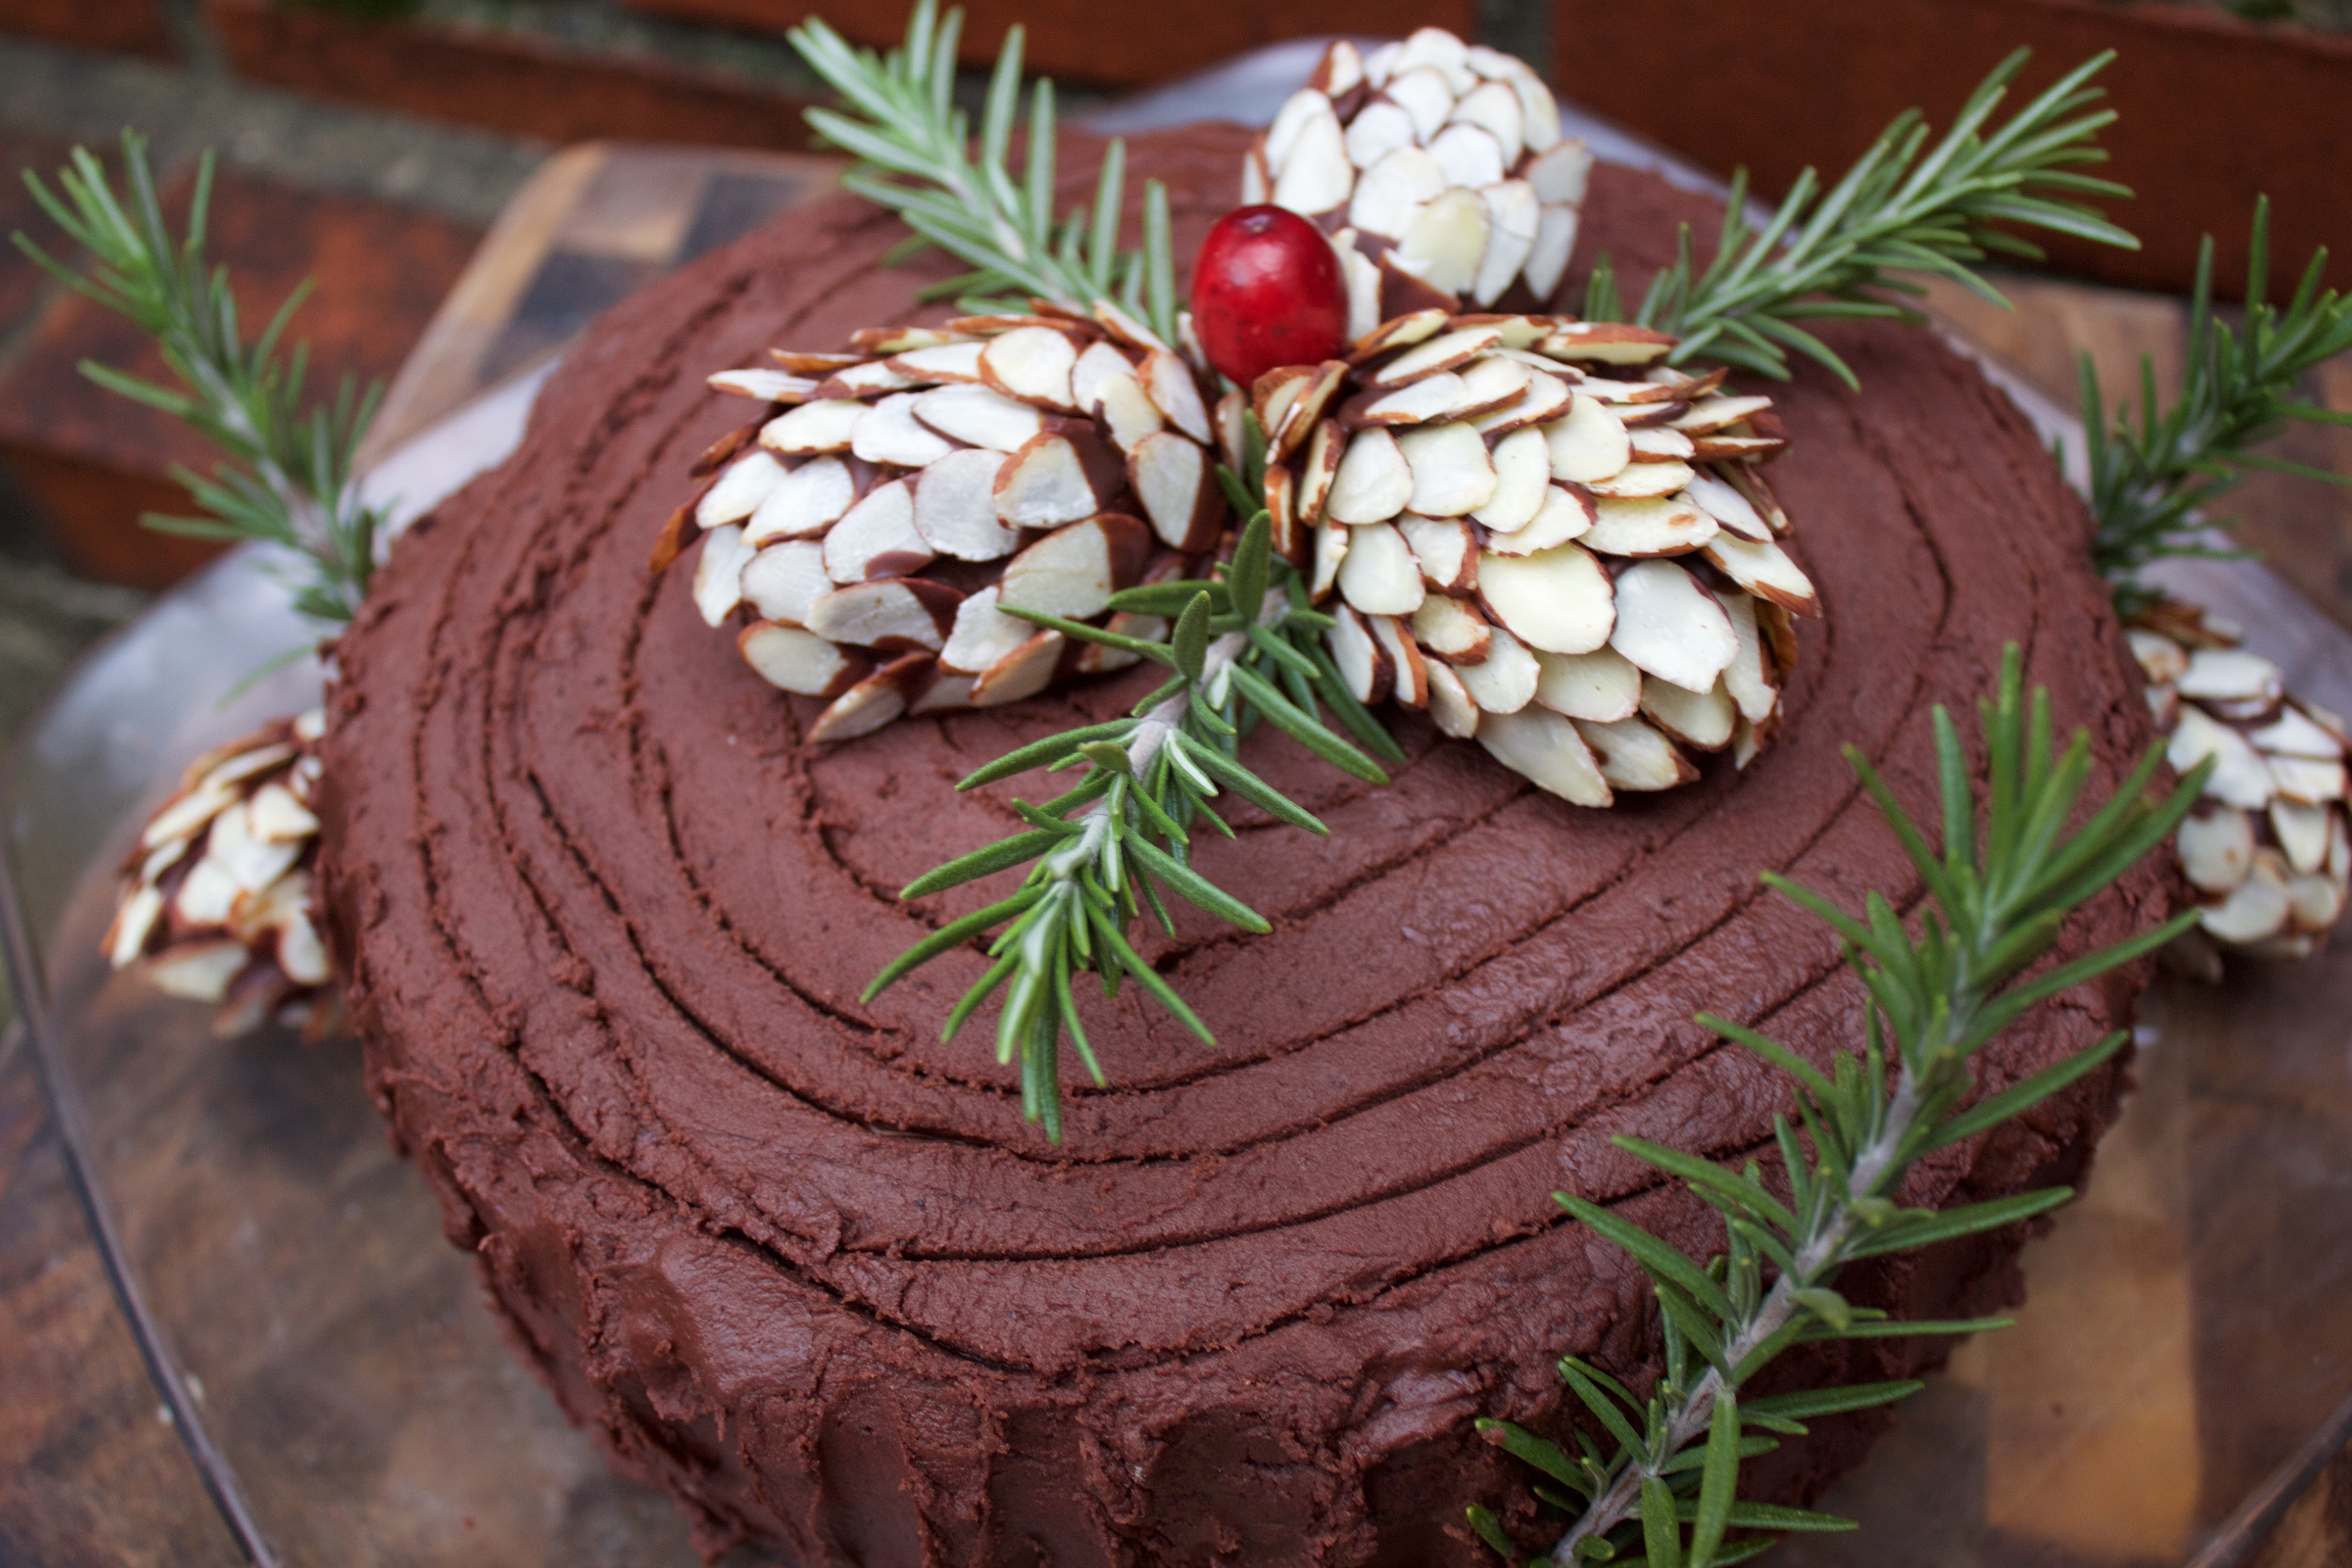
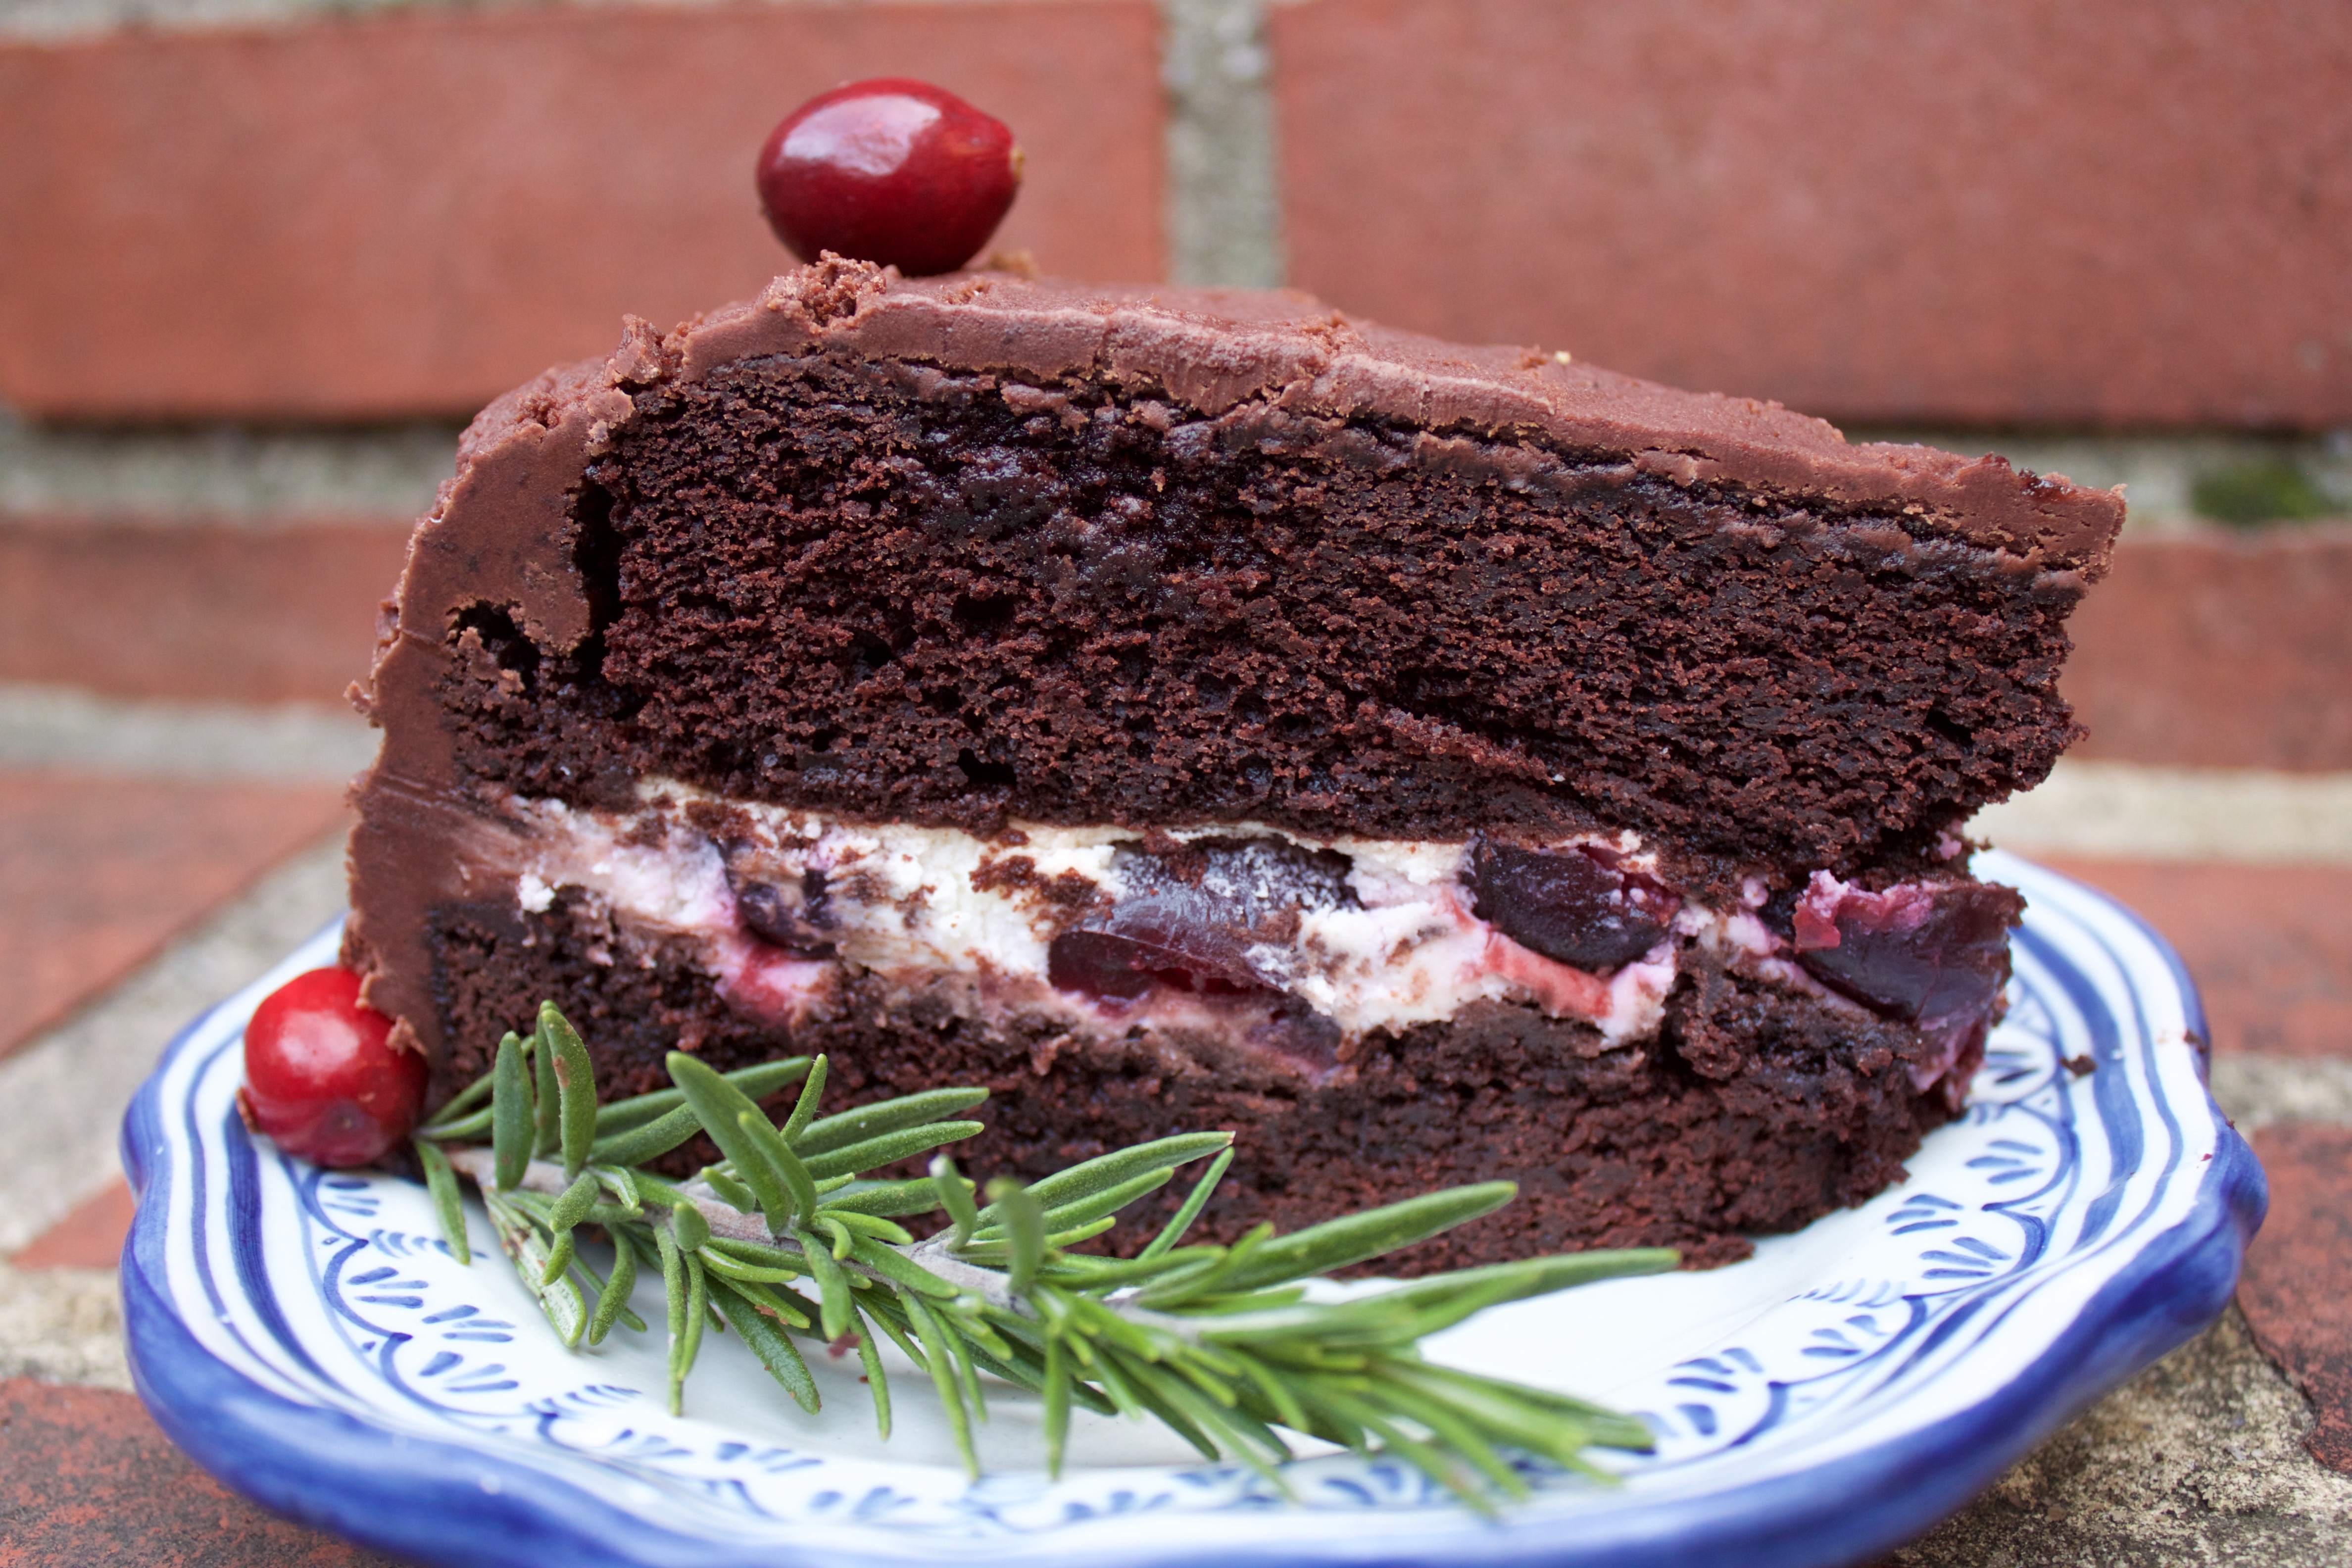
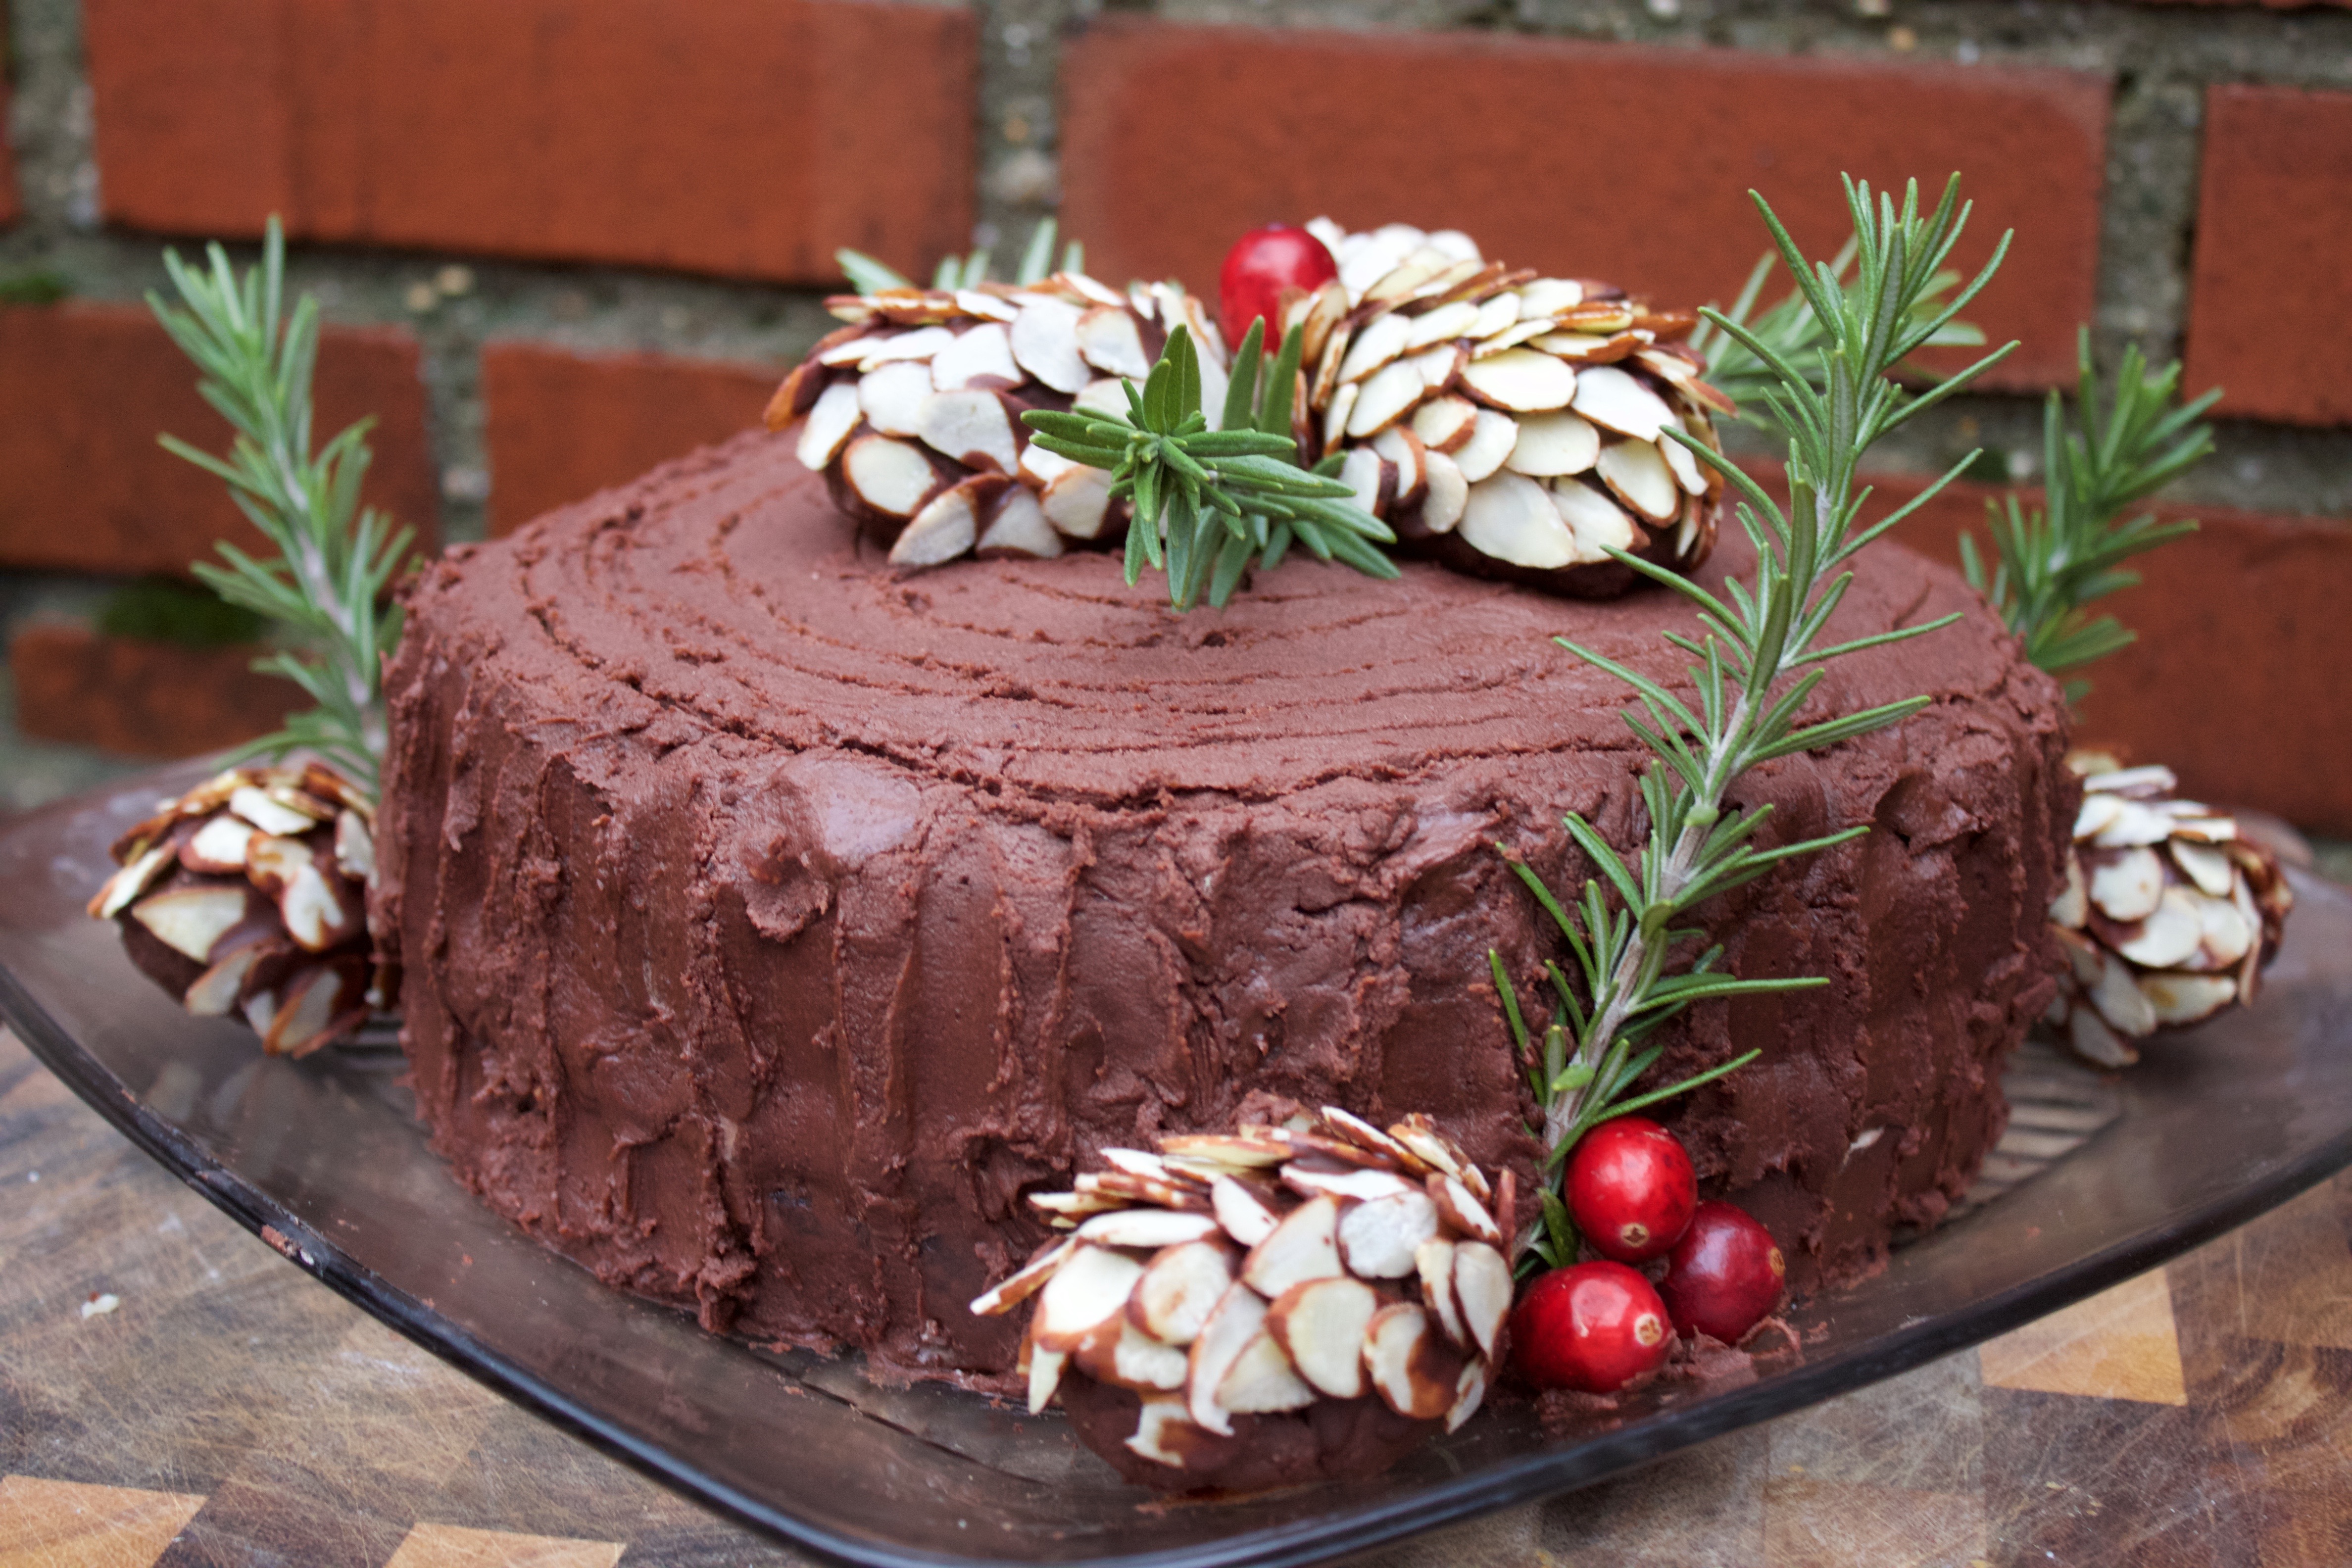
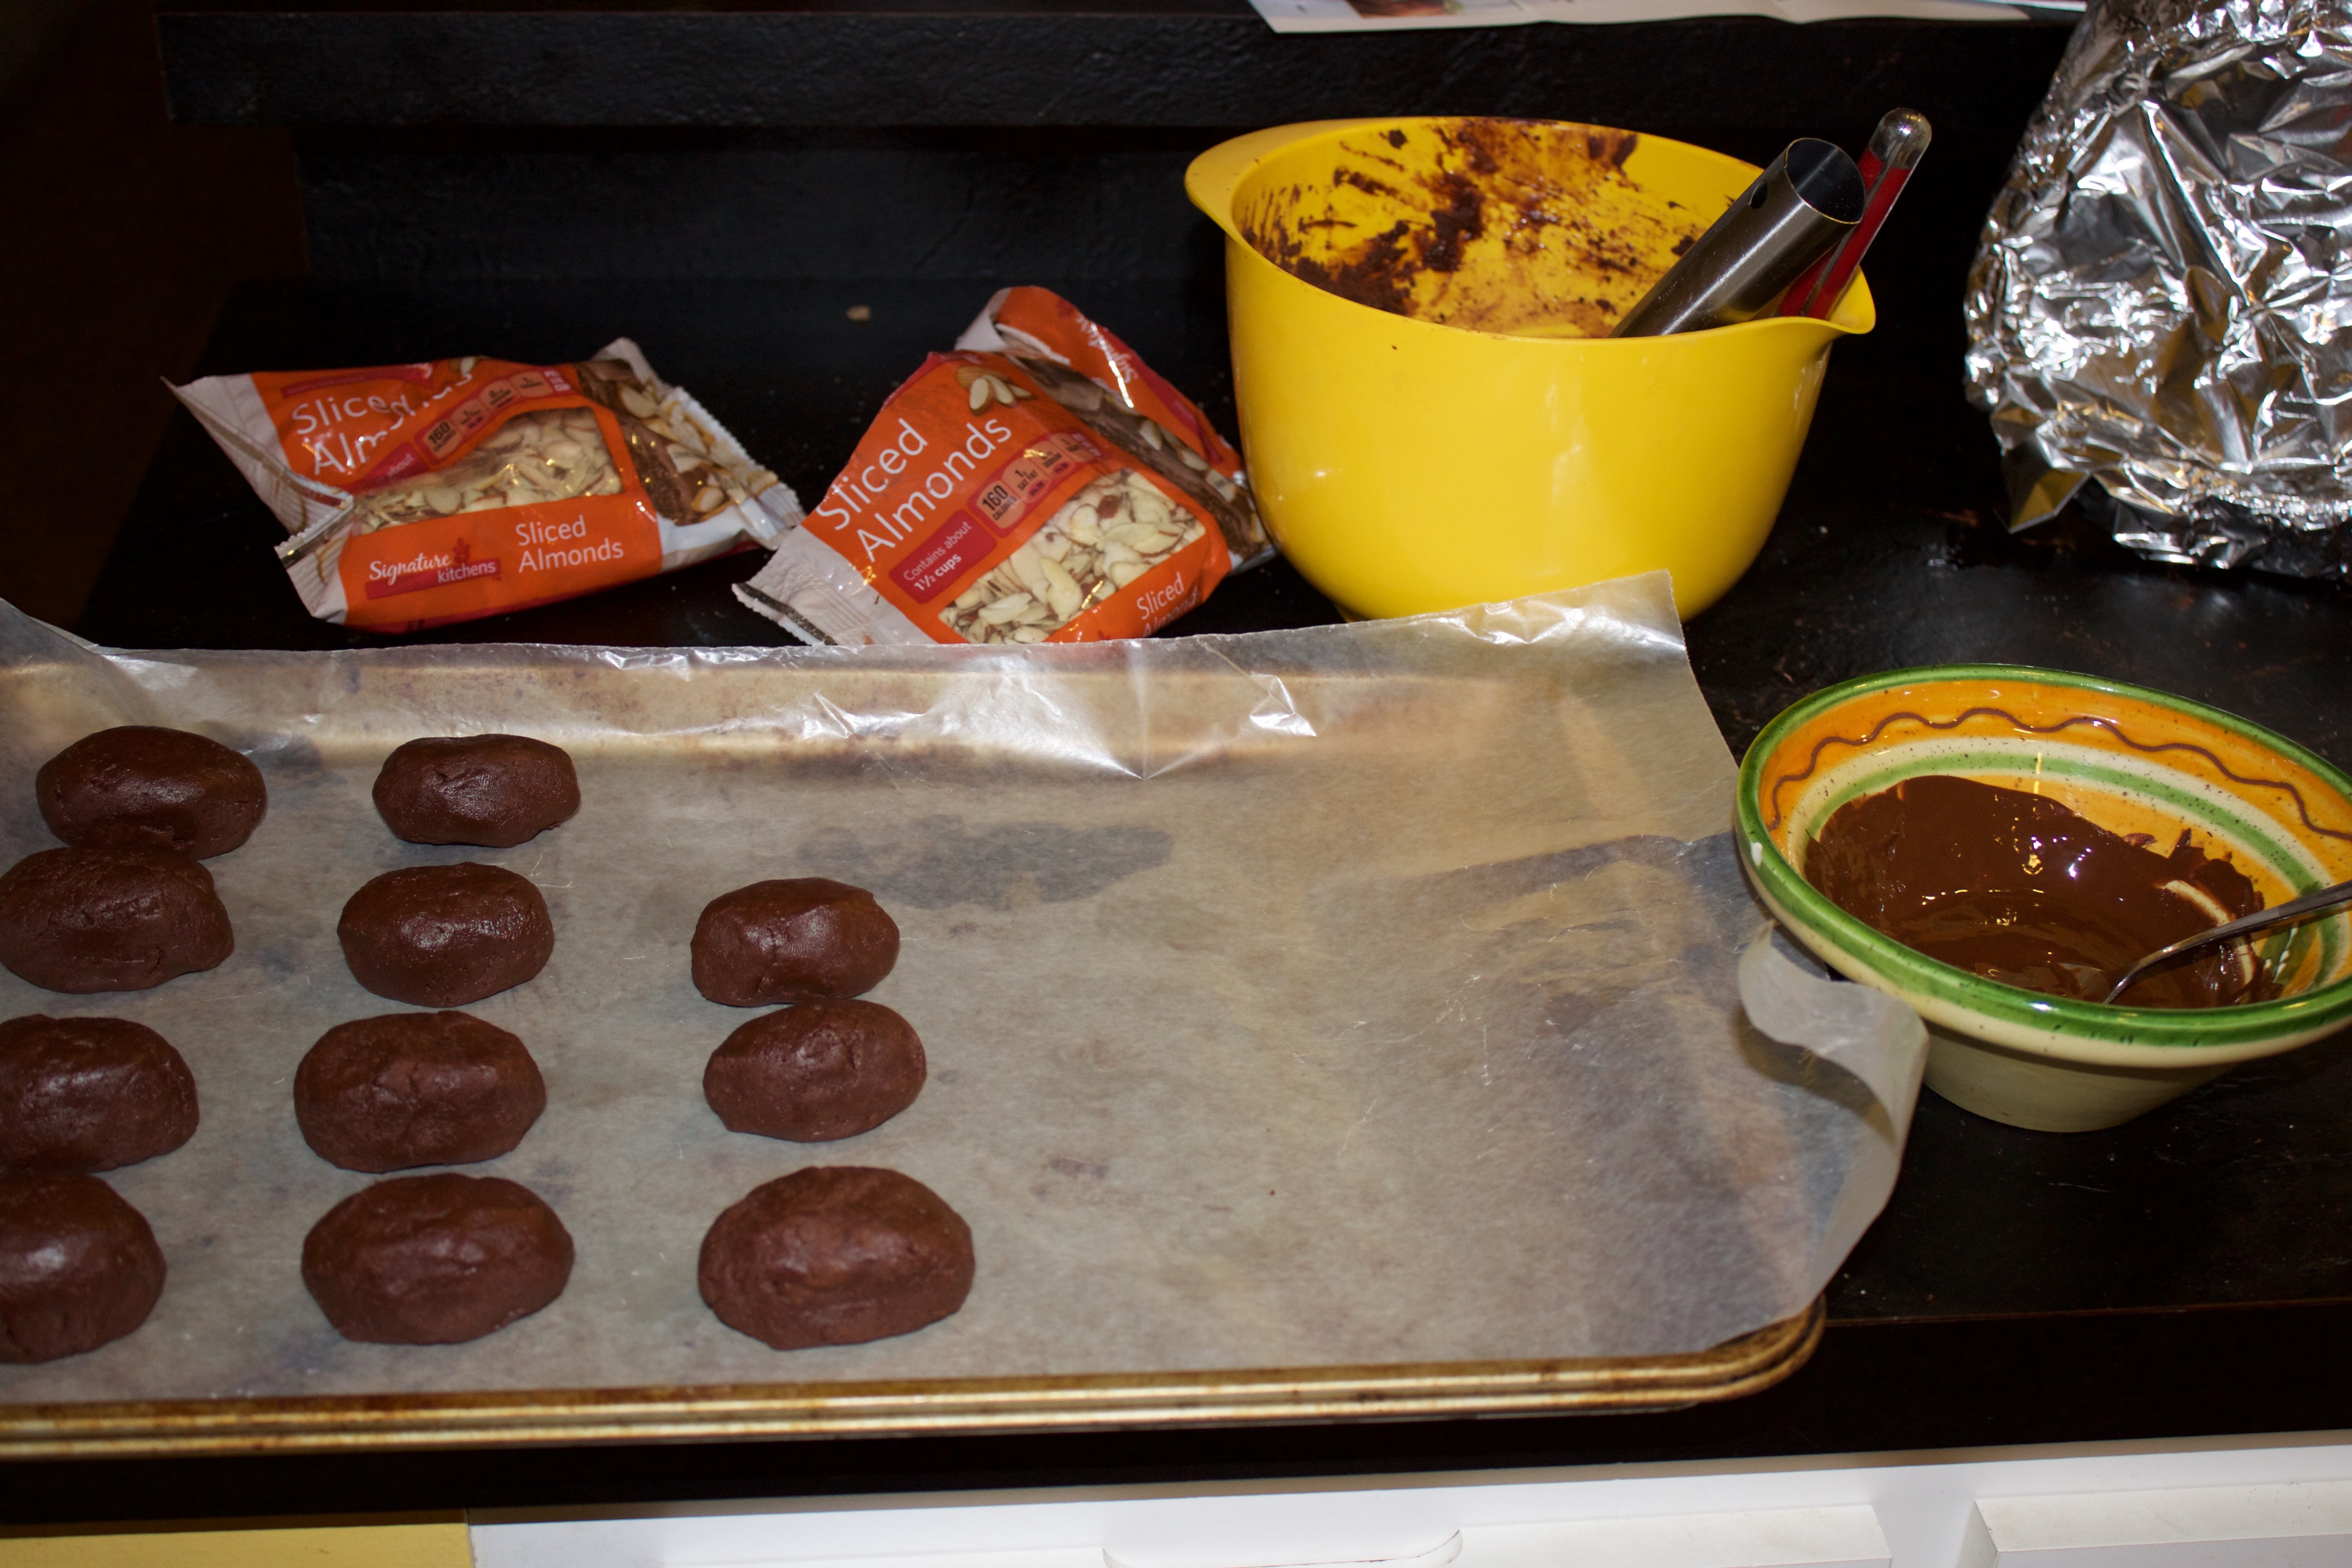
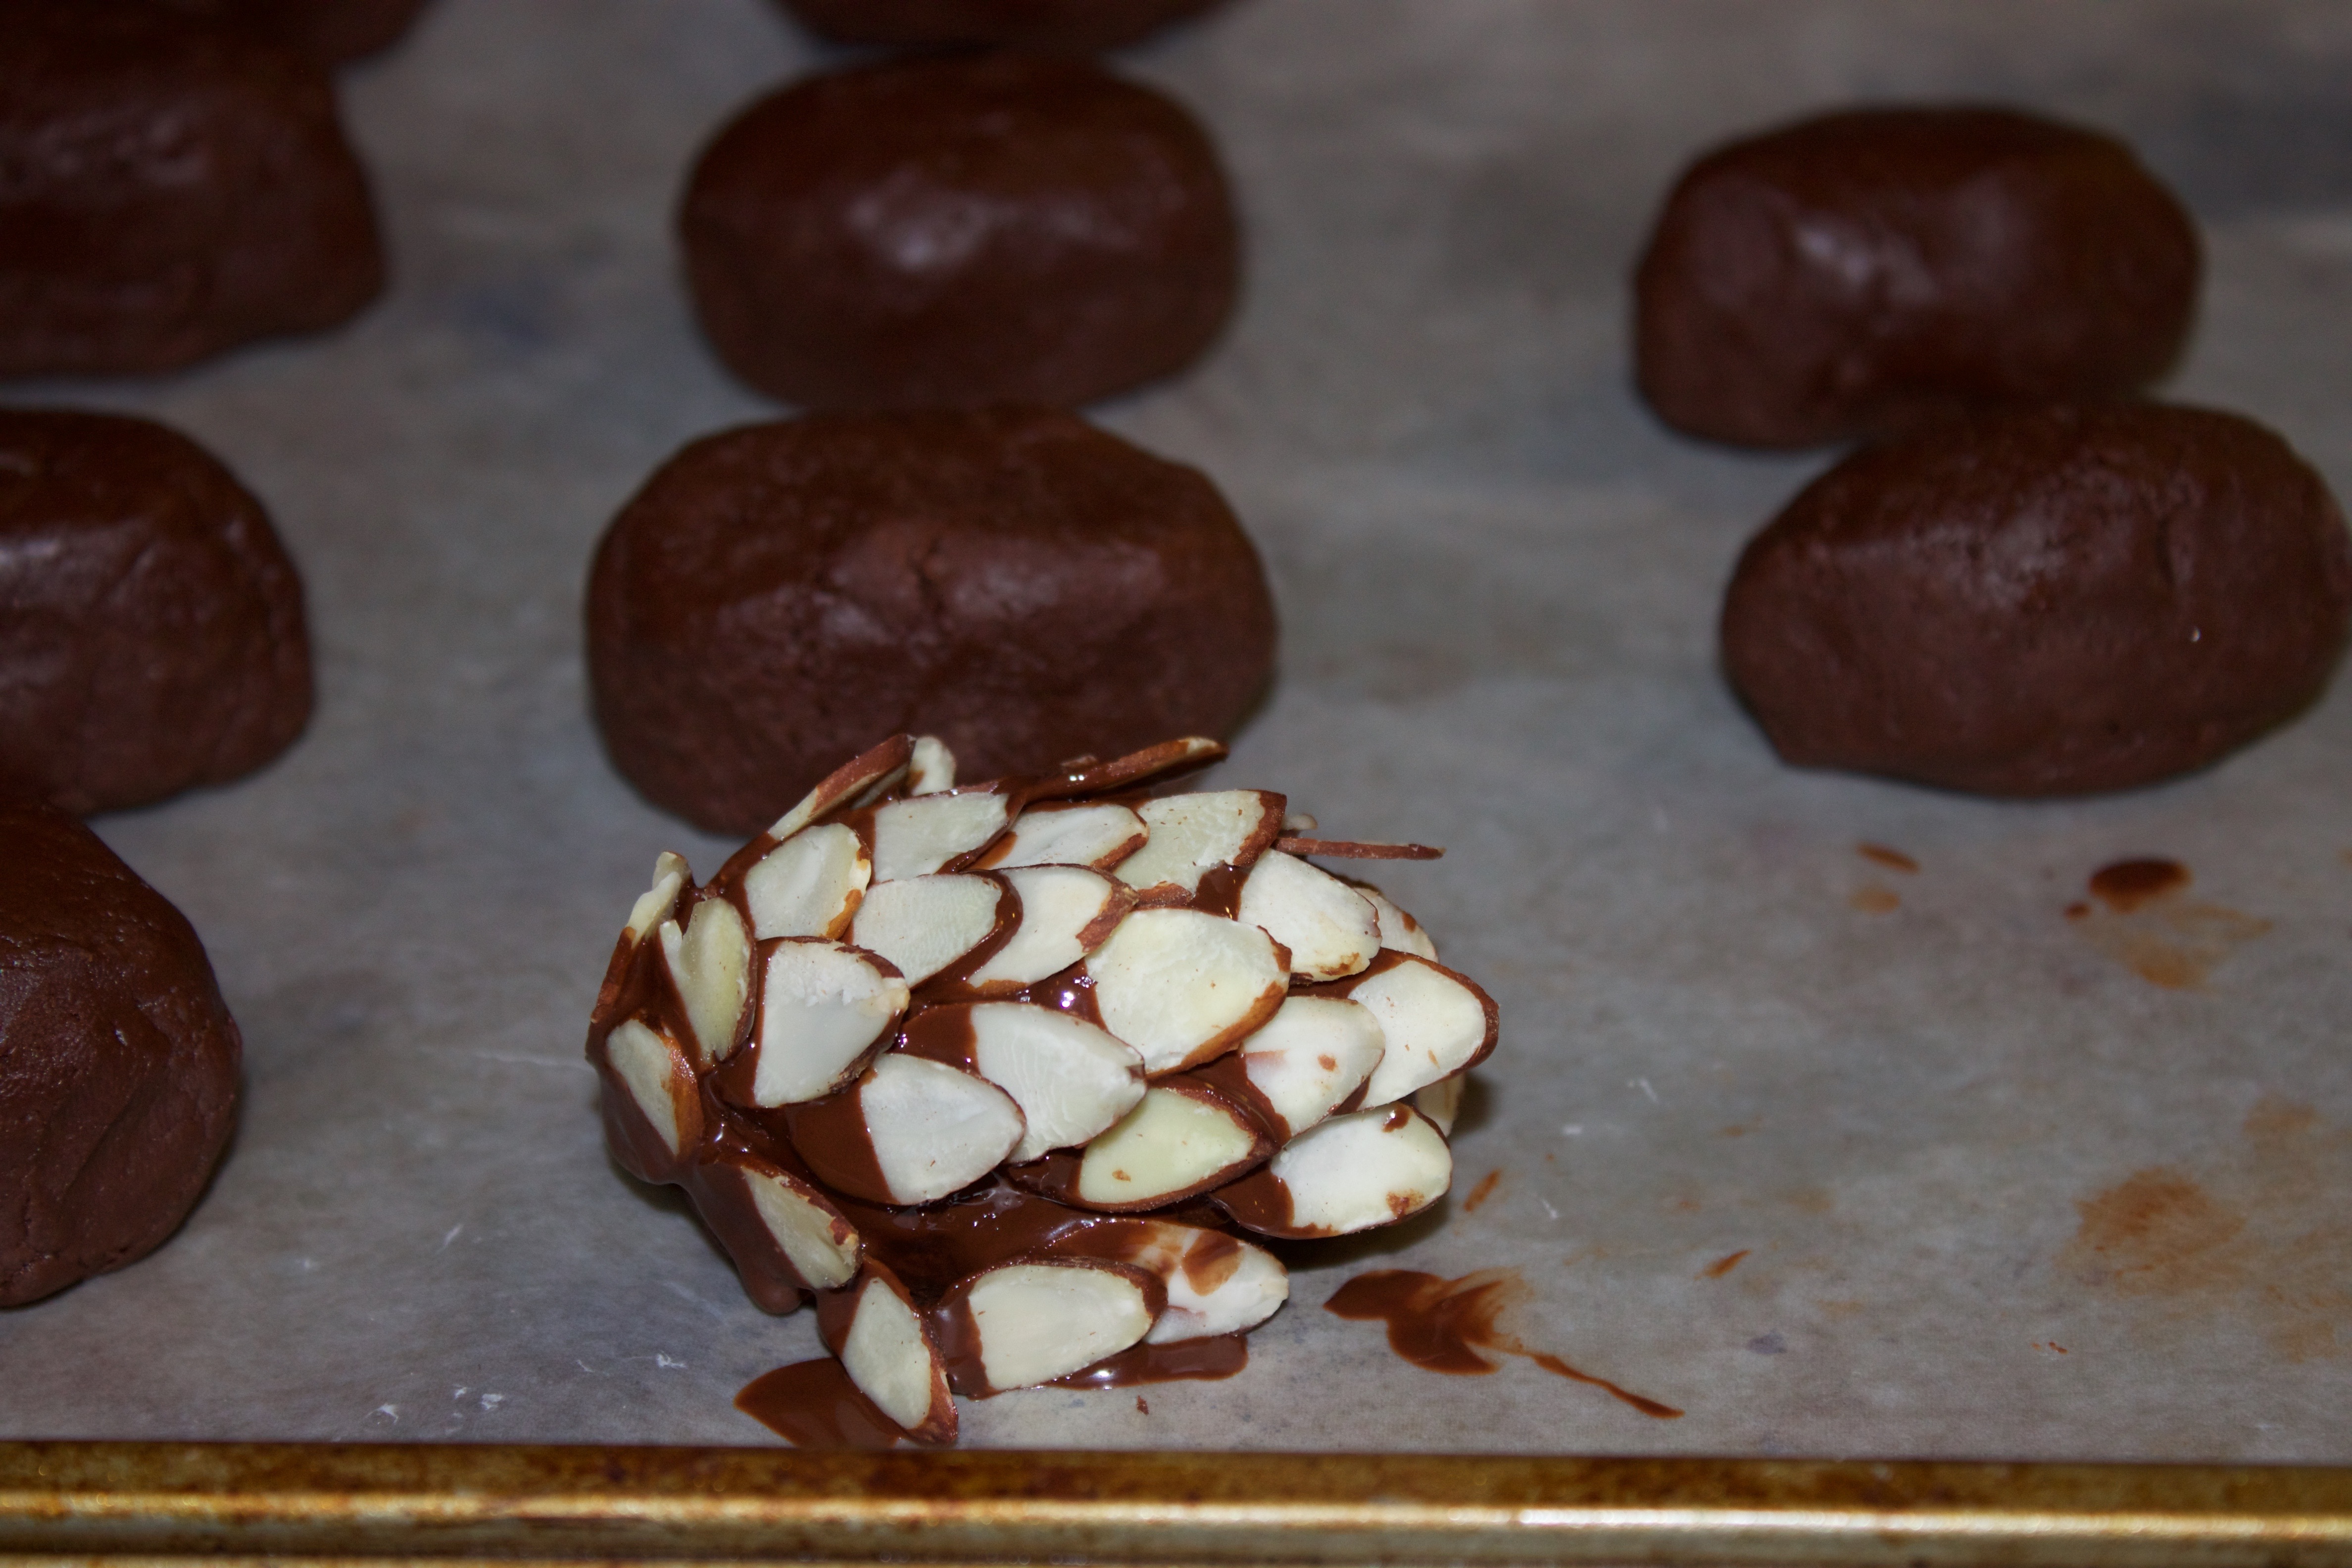
Since it was the last Bakeolution of the year, I decided I should go out with style. Festive style, that is! After considering sparkling cranberries, peppermint meringue kisses, and edible snow globes (!!!) I decided on this beautiful, rustic black forest yule stump cake. Instead of meringue mushrooms, I went with chocolate pinecones: chocolate truffles flavored with just a bit of cherry, coated in sliced almonds attached with melted chocolate. I’ll be honest: this cake is a lot of work (although perhaps not any more work than the strawberry shortcake cheesecake I made in October), but if you have the time and patience to make all the components, it’s sure to be a hit at your holiday party! I personally don’t have the patience to spend an entire day baking, so I broke this into steps making the cake and pinecones on Saturday and the remaining components and assembly on Sunday. This is a rich cake, and will easily satisfy 16-20 chocolate lovers!
Black Forest Yule Stump Cake
Adapted from Chow Hound

For the cake:
You should also feel free to use your favorite chocolate cake recipe. Nothing was extraordinary about this one. Just make sure it makes 2 x 9″ round cakes
- 1 1/4 cups water
- 4 ounces unsweetened chocolate, chopped
- 1/2 cup good quality cocoa powder
- 1 3/4 cups all-purpose flour
- 1 1/2 teaspoons baking soda
- 1/2 teaspoon fine salt
- 12 tablespoons unsalted butter (1 1/2 sticks), at room temperature
- 1 3/4 cups granulated sugar
- 3 large eggs
- 1/2 cup sour cream
- 1 1/2 teaspoons vanilla extract
For the cherries and syrup:
- 1 (15 oz) can dark sweet cherries in heavy syrup (you can use one 13.5 oz jar of these, which can be found at Whole Foods)
- 2 tablespoons kirsch or cherry-flavored liqueur (I actually used Madeira because I didn’t want to buy liquor specifically for a cake; worked well!)
- 1 tablespoon freshly squeezed lemon juice
For the whipped cream filling:
- 2 tablespoons granulated sugar
- 1 teaspoon cornstarch
- 1 cup cold heavy cream
- 1/2 teaspoon vanilla extract
To assemble:
- 2 recipes Bittersweet Chocolate Frosting (I used this, and it wasn’t perfect; you can also buy a chocolate buttercream)
- 6-8 chocolate pinecone truffles (unless you have the patience of a saint, I highly recommend cutting this recipe in half; don’t waste your chocolate. I used semi-sweet chocolate chips; please note you can use more of these rather than also purchasing chocolate wafers)
- Handful of fresh cranberries
For the cake:
- Heat the oven to 350°F and arrange a rack in the middle. Cut out 2 (9-inch) rounds of parchment paper. Coat edges of 2 (9-inch) cake pans with butter, place the rounds in the pans, and coat the parchment with more butter. Coat the pans and parchment with flour and tap out any excess; set aside. (I skipped this entire part because I didn’t have parchment paper and just sprayed the pans with cooking spray; it worked out, but I’d recommend not risking it).
- Bring the water to a boil over high heat in a medium saucepan. Remove from the heat, add the baking chocolate and cocoa powder, and whisk until smooth; set aside to cool for 10 minutes.
- Whisk together flour, baking soda, and salt in a medium bowl until combined; set aside.
- Place the measured butter and sugar in the bowl of a stand mixer fitted with a paddle attachment and beat on medium speed until fluffy and light in color, about 5 minutes. Stop the mixer and scrape down the sides of the bowl and the paddle with a rubber spatula.
- Return the mixer to medium speed. Add the eggs 1 at a time, letting each incorporate fully before adding the next. Add the sour cream and vanilla and beat until just combined. Stop the mixer and scrape down the sides of the bowl and the paddle.
- Add a third of the reserved flour mixture and turn the mixer to low speed, mixing until the flour is just incorporated. Add half of the cooled chocolate mixture and mix until just incorporated. Continue with the remaining flour mixture and chocolate mixture, alternating between each and ending with the flour, until all of the ingredients are incorporated and the mixture is smooth. Stop the mixer, remove the bowl, and stir in any remaining flour streaks by hand, making sure to scrape the bottom of the bowl.
- Divide the batter evenly between the prepared pans and spread it into even layers. Bake them side by side on the rack for 15 minutes. Rotate the pans and continue baking until the cake edges slightly pull away from the pans and a cake tester or toothpick inserted into the center comes out dry with just a few crumbs, about 15-17 minutes more.
- Remove the pans from the oven and let them cool on a wire rack for 45 minutes. Run a knife around the perimeter of each cake, turn them out onto the rack, and slowly peel off and discard the parchment rounds. Flip the cakes over and let them cool completely.
For the cherries and syrup:
- Strain the cherries over a medium-sized bowl, reserving the syrup. Remove stems if they have them, and cut the cherries in half.
- Bring the syrup to a boil over medium-high heat. Reduce the heat to medium low and simmer until reduced to 1/3 cup, about 10 to 12 minutes. Remove from the heat and stir in the liqueur and lemon juice.
- Add 2 tablespoons of the syrup to the reserved cherries and stir to combine; set aside the remaining syrup until ready to assemble the cake, letting it cool completely, about 30 minutes.
For the whipped cream filling:
- Place the sugar and cornstarch in a small saucepan. While stirring constantly, pour in 1/4 cup of the cream. Place the pan over medium heat and bring to a boil, stirring constantly until smooth. Remove from the heat, stir in the vanilla, and chill completely, about 30 minutes. Meanwhile, place the remaining 3/4 cup cream in the bowl of a stand mixer and refrigerate; refrigerate your whisk attachment as well. It is very important everything is very cold or your cream will separate; trust me, I learned this the hard way!
- When the cornstarch-cream mixture has cooled completely, fit the chilled bowl of cream onto the stand mixer. Using the whisk attachment, whisk on medium speed until tracks begin to show in the cream, about 40 to 60 seconds. With the mixer still on, slowly add the cornstarch mixture and continue whisking until stiff peaks form, about 30 to 60 seconds more. Refrigerate until ready to assemble the cake.
To assemble:
- When the cakes are cool, use a serrated knife to trim a thin layer from the top of each to expose the interior and level the top of the cake;
discardeat the scraps and set the cakes aside. - Using a skewer, poke holes all over the tops of the cakes, going about halfway through the layers.
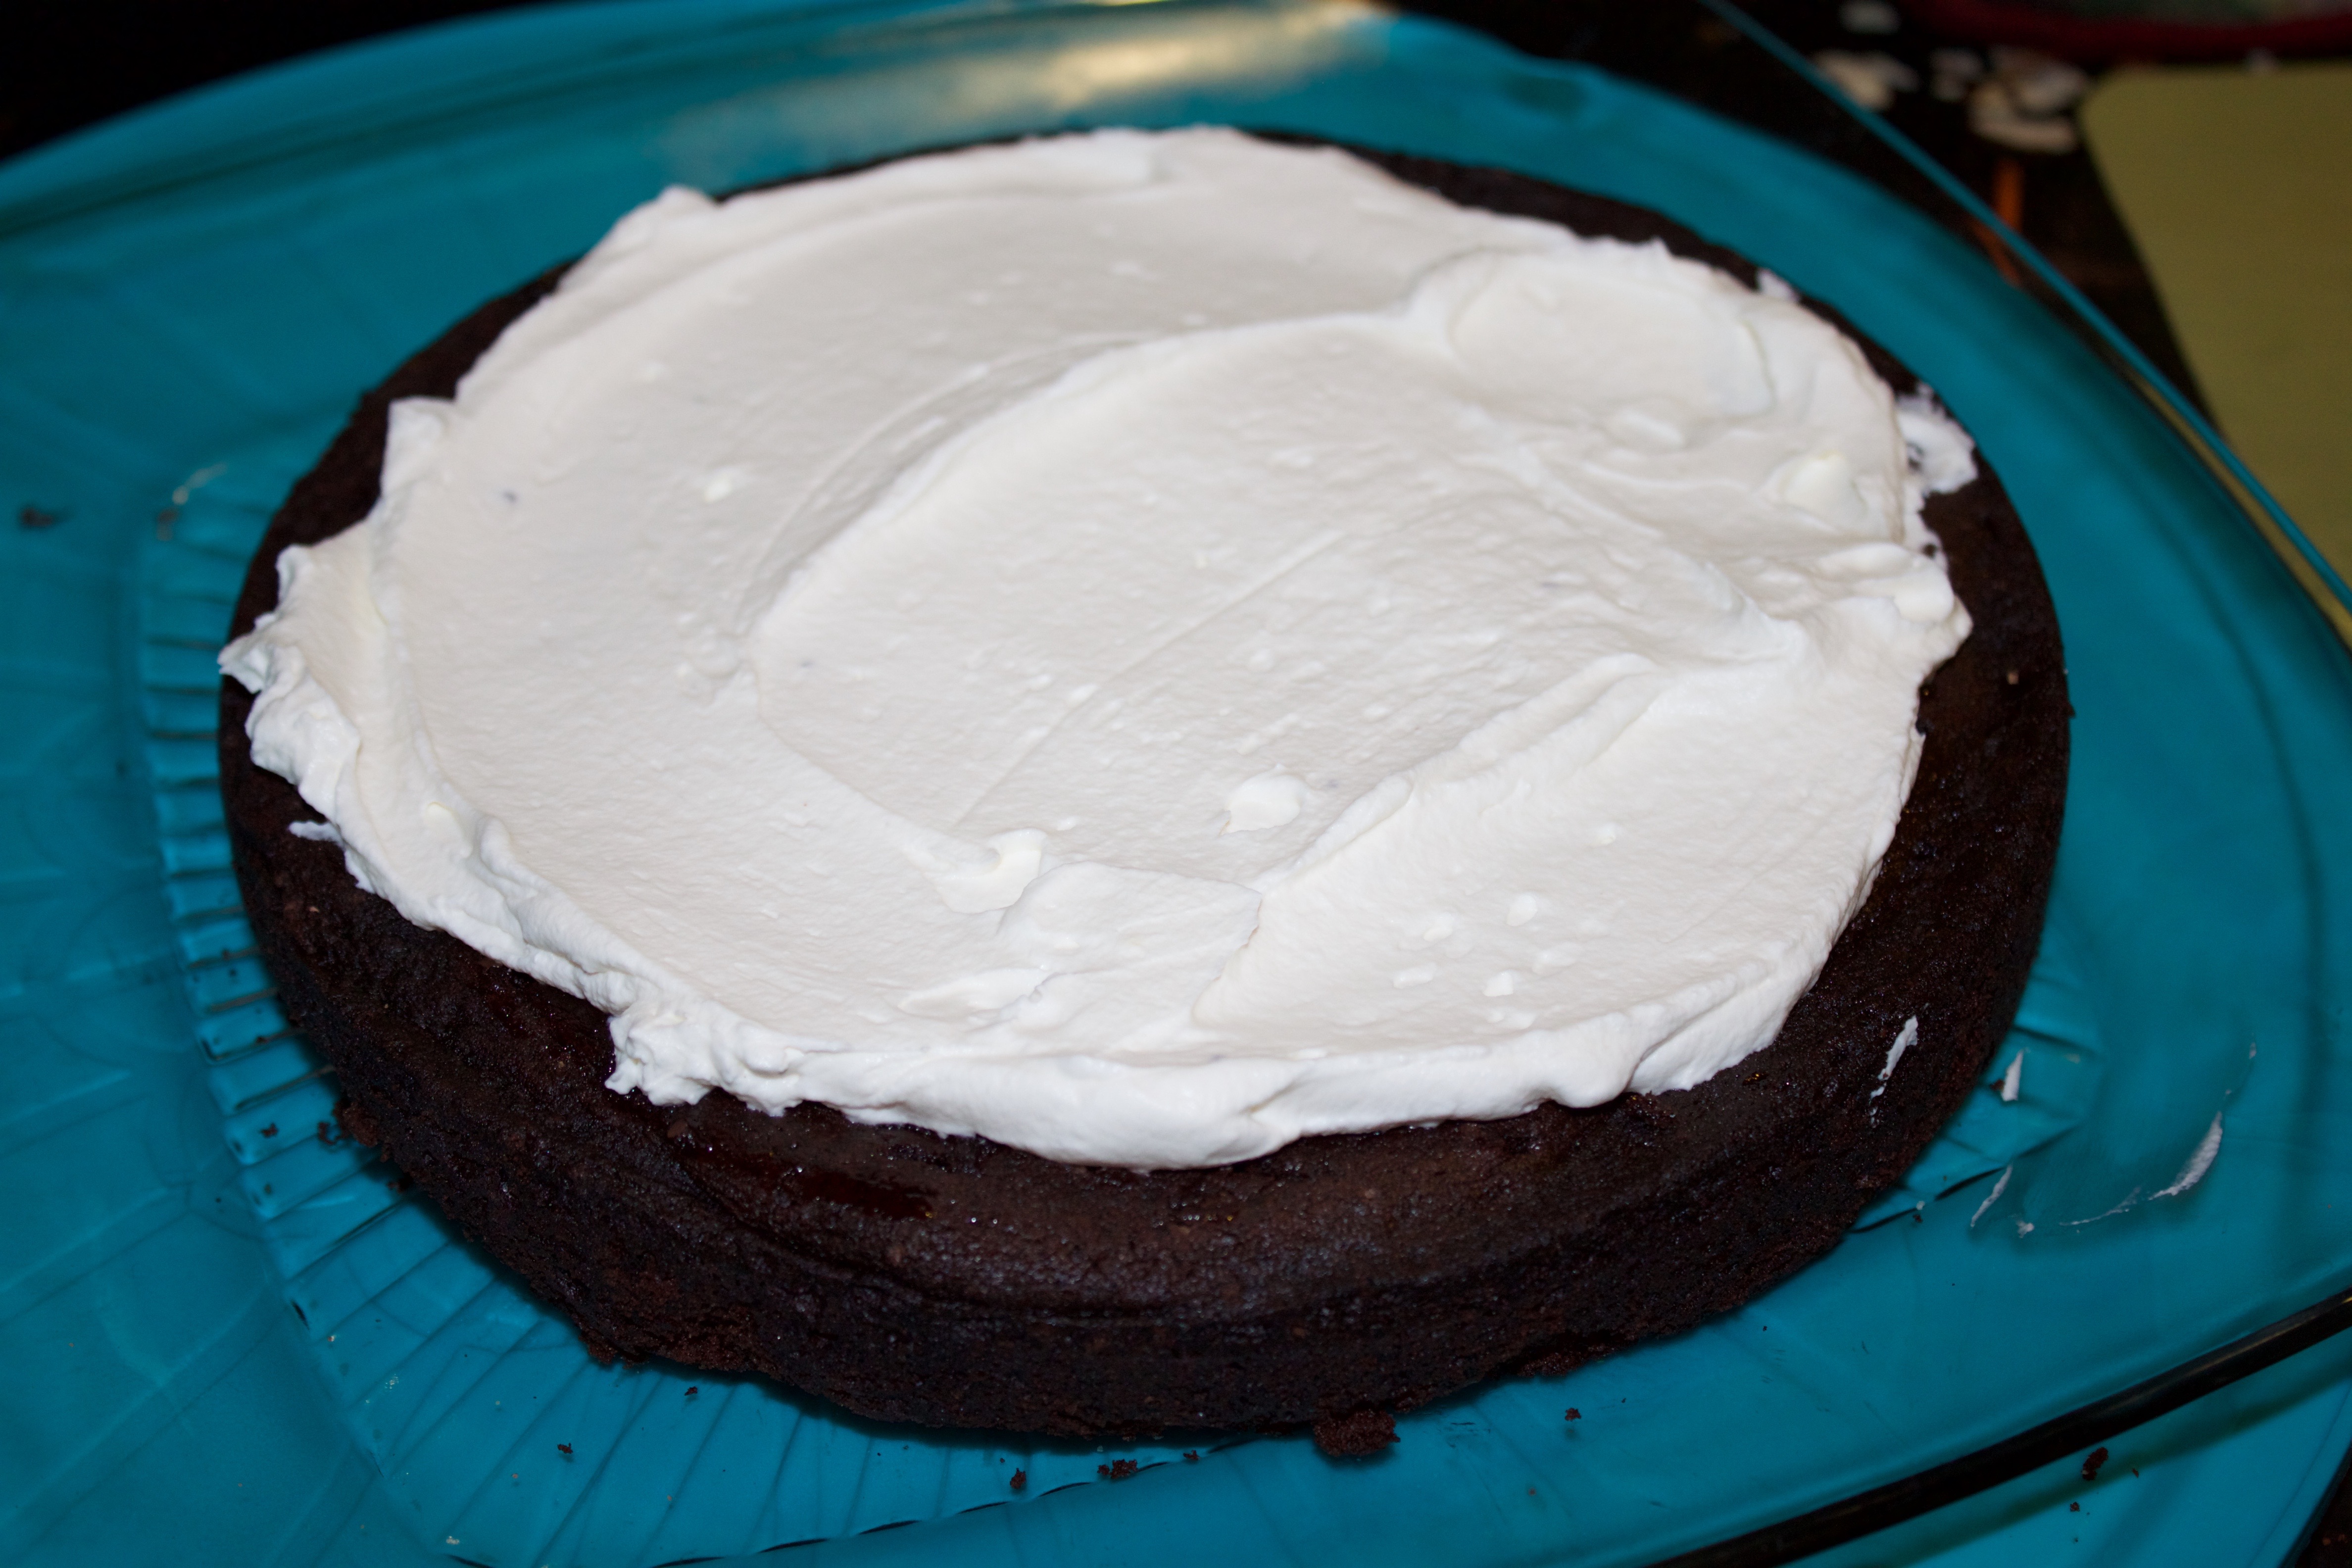
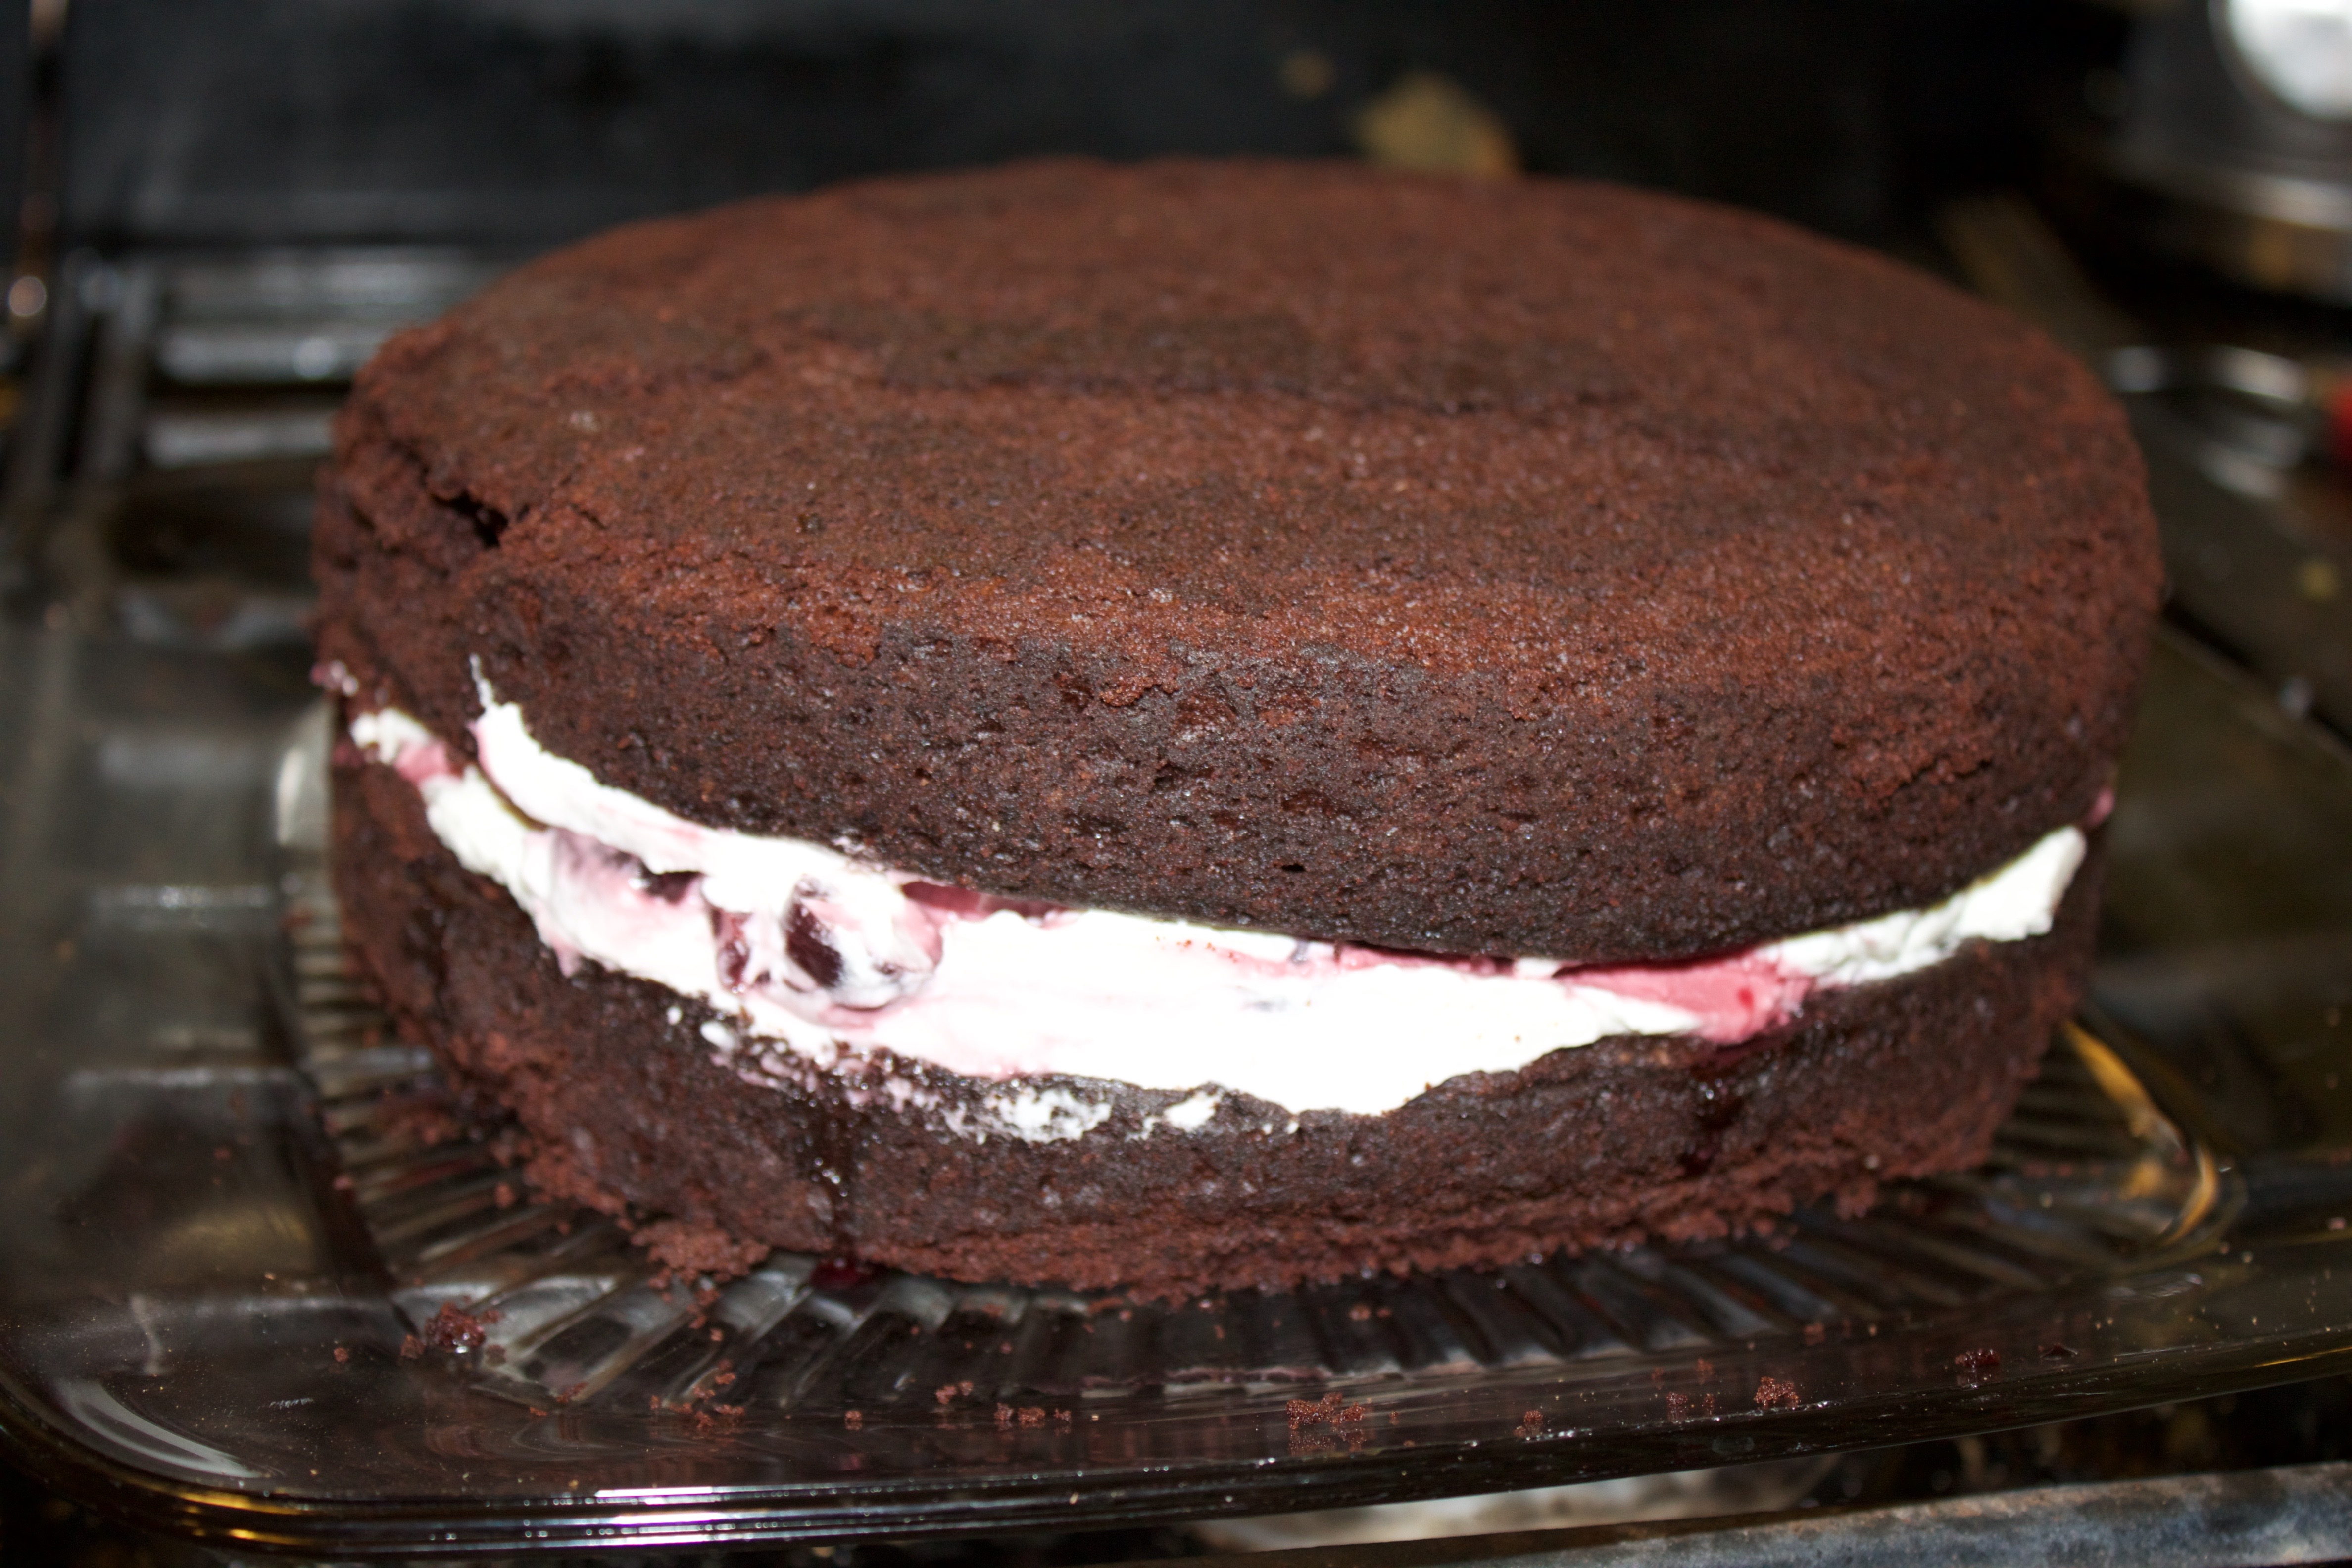
- Place 1 cake layer cut-side up on a cake stand or serving plate. Use a pastry brush to brush half of the reserved syrup over the cake (you can also drizzle it). Spread half of the whipped cream evenly over top of that, leaving a 3/4-inch border.

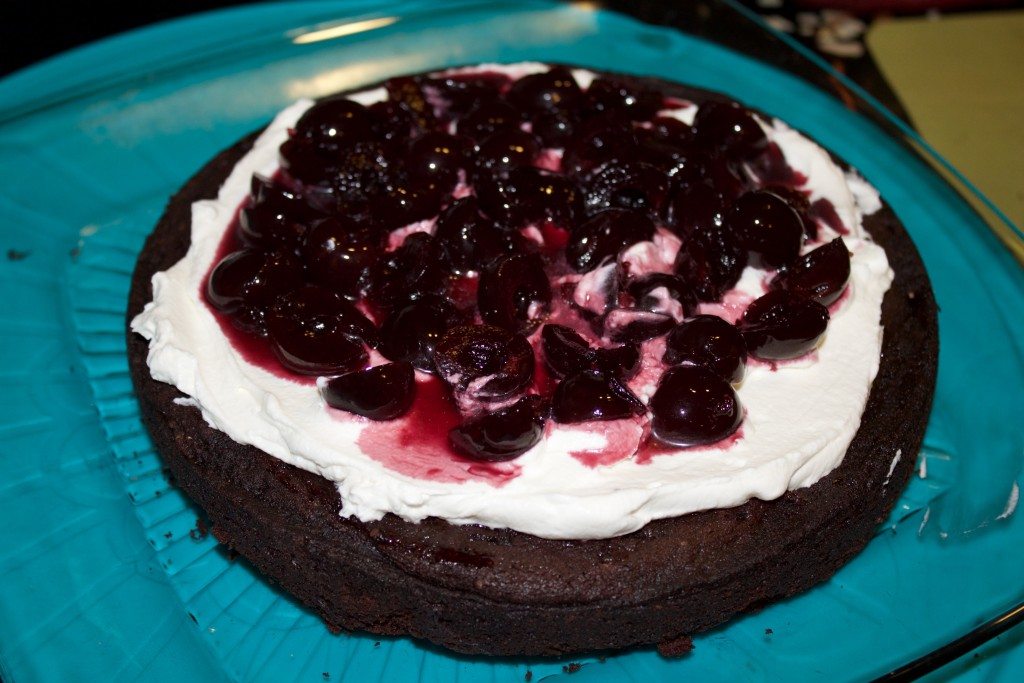

- Using a slotted spoon, evenly scatter the reserved cherries over the cream, leaving any syrup in the bowl. Dollop the remaining whipped cream over the cherries and spread it into an even layer, leaving a 3/4-inch border.
- Place the second cake round cut-side up on top of the whipped cream and press down gently. If any of your cream comes over the edge, smooth it over. Brush (or drizzle) the cake with the remaining half of the syrup.
- Using all of the frosting, evenly coat the top and sides of the cake. To create the tree-stump effect, use a butter knife to make vertical lines in the side of the cake, spacing them about 1″ apart. Use the skewer or the tip of a fork to make the concentric circles on the top of the stump.
- Garnish with chocolate pinecones, rosemary springs and cranberries!

Game plan: You can prepare the cake layers up to 2 days in advance. Just wrap them tightly in plastic wrap and store at room temperature. You can prepare the entire cake up to 1 day in advance, refrigerate it, and let it sit at room temperature for about 1 hour before serving.
Serves 16-20