
DIY Guide: How to Make Your Own Brooch Bouquet
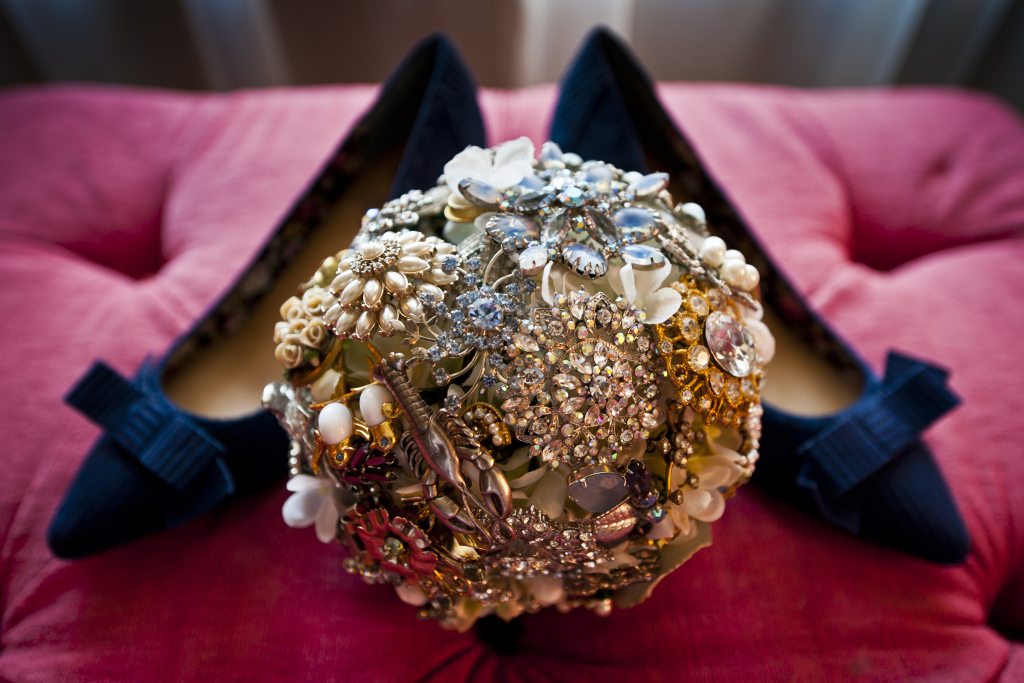
The very day that I met with our florist to discuss the beautiful sunflower bouquet I would carry down the aisle, I saw a picture of a vintage brooch bouquet and fell in love. I convinced myself that it would be too much work, that I’d never be able to get enough brooches, and that I couldn’t renege on the bouquet I’d just picked out. Luckily, my mom convinced me otherwise and I got to carry this gorgeous bouquet down the aisle, complete with gifts and heirlooms from my closest family and friends.


Thank you to Geoff Johnson for these wonderful photos!
So how does one go about making one of these beauties? Well, I read a number of ‘how to’ guides on the best methods to make a brooch bouquet. What I found was that no two seem to be made alike. This is kind of one of those things that you have to make up as you go along. However, I can describe for you how I made my bouquet and a key few pointers I learned along the way that I think you will find quite helpful.
First, a Few Do and Don’ts
Brooch bouquets can be incredibly time intensive and expensive to make and there are a few things you can do to minimize your blood, sweat and tears.
- DO enlist the help of family and friends. All of the ladies brought a unique brooch to my bridal shower. This gave me a good start to my bouquet and also made it a whole lot more meaningful!


- DON’T pay a lot for any one brooch. You need over 50 in all, so unless you have a sky high bouquet budget, don’t plan to pay more than a dollar or two a pop. Flea markets and E-Bay are both great.
- DO narrow your bouquet to a general theme. If you start throwing too many different colors and styles on, it will start to look tacky.
- DON’T wait until the last-minute. Wire your brooches as you go along. I did a couple a night, as I collected them. Trust me, if you wait until the last-minute you will regret it. Wiring is very time-consuming and can even get a bit painful.


Materials:


- Needle nosed wire cutter
- 22-gauge green floral wire
- Hot glue gun
- 50+ brooches, depending on size
- Artificial hydrangea (I used two large bunches)
- Green corsage tape
- Duck Tape
- Ribbon to wrap stem
- Additional ribbon and decor for bouquet bib
Assembling your bouquet:
- The first step is wiring the individual brooches. Wiring is generally done through the clasp of the brooch, but your wiring method will vary depending on the backing of each particular piece. Start by cutting two pieces of wiring twice the length you want the stem of your bouquet. Fold one piece around one side of the clasp and twist the two sides of the wire you have strung through the clasp, tightly.
- Repeat on the other side of the clasp. Now tightly twist these two piece together. For some of the smaller brooches, you may be able to wire only one piece through and twist. Ultimately, you will need to get a feel for what it takes to make a secure stem. You will know it’s secure if the brooch doesn’t flop over when held midway down the stem.
- Finish off by wrapping the corsage tape around the wire, gently overlapping.

As I mentioned above, I highly recommend making these stems as you go along, preferably over a couple of months. Wiring these made my hands sore with just 1-2 a night, I can’t imagine having done them all at once!
Next is the tricky part, putting them all together. For this, I actually headed to the craft store not knowing exactly what I would pick up to assemble my stems. I had seen many different recommendations for assembling. I ended up picking up several stems of artificial hydrangea, which turned out to be a lifesaver! The artificial flowers provide a base to brooches and also give the bouquet volume.
- Start by trimming the hydrangea stems to the length you want your bouquet stem. Next use wire to bind them together.
- Now, pull your brooch stems one at a time through the flower and attach them to the hydrangea stems at 2-3 points, using wire. Start with your favorite brooches, and place towards the center. You will see that certain brooches fit together well. As you add each stem in, you will start to see where you need more of certain colors and shapes and what areas need to be filled in. You can actually adjust the brooches a good deal once they are attached so that they sit how you want them,
- Once you are satisfied, wrap the entire stem tightly with duck tape, being careful to trim and cover any sharp spots. Next, using a hot glue gun, carefully wrap and attach the ribbon you want to cover your stem.
- The last step is making the “bib.” Cut another piece of ribbon–you will want to cut it longer than you might expect to allow for the ruching. Attach one end with glue gun and let dry. Fold the ribbon almost as if making a bow and glue the base of the loop. Continue until you have a full bib.
I finished the stem off with the decorative pearl ribbon, as shown below. There is a lot of flexibility as to how you finish off your bouquet, based on how you want it to look. Be creative and remember, the glue gun is your best friend!


Love the bouquet! It’s simply gorgeous, Jo! -Sugar
[…] By johannaelsemore, […]
[…] including LITB, thrift stores, garage sales etc and chosen to fit your color scheme perfectly. Use this guide to build your bouquet, make sure to buy base fabric flowers to build your […]
[…] the most popular post by far is not even slightly kitchen related. DIY Guide: How to Make Your Own Brooch Bouquet gets far more views each day than any of the rest of my […]
Beautiful and really well explained
Thank you so much for this helpful tutorial! Your bouquet is beyond beautiful, I cannot wait to make mine!
I’m so glad you found it helpful! It’s a lot of work, but you won’t regret it! Congratulations on your wedding and please don’t hesitate to drop a line if you have questions as you make your bouquet – I would love to see pictures one it’s all done!
Thank you!!!! So much!!! I decided to give this a go and just get stuck in. After dismantling a few times I went in search for Some help! Then I found you!! Really well explained and such a beautiful finish! I have 9 months until my wedding but wanted to get started as I don’t get a lot of time. Any extra tips you can give would be great!! I have around 85 brooches of all different sizes. The small ones are surprisingly useful aren’t they?!
Thank again x
So glad you found it helpful! It can be overwhelming to get started, but it’s such a fun bouquet! My recommendation is to place your very favorites front and center, and then fill the rest in around them. Things can always be tweaked and moved as you go, as long as you’re careful. I’d love to see a picture of your finished bouquet!
I have a question… How do you attach the stems to the hydrangeas at 2-3 points with wire? I am confused at this part. Thanks!
Wrap wire tightly around both the stems of the hydrangeas and the stem of your brooch.
Thanks so much for this guide – it’s the best one i’ve seen! I have nearly finished wiring all my brooches, so am now looking at getting the artificial hydrangea ready for assembling! Most of the ones I have looked at have 1 stem for a bunch of flowers, so when you say ‘two bunches’ did you just have two stems? Hope that makes sense! x
Thank you! I’m so glad it’s been helpful and would love to see the final product! As for the hydrangea, most of the stems they sell aren’t big enough to be a base for your bouquet. I bought two stems of hydrangea, but they ended up taped together along with the stems of the brooches, so the end product only looks like it has one stem. Does that make sense?
Yes that’s great – thank you 🙂 I will send you a pic when i’ve finished! X
Your bouquet is lovely Johanna! Congratulations!
I am making a bouquet for my daughter and am at the home stretch with all of the brooches wired and wrapped, now I’m just thinking about how to assemble it. I do have a couple of questions. I’m trying to visualize how you actually assembled it. I understand that you start with wiring the stems of the flowers together, but then I’m unclear about the rest. Are you holding the stems in one hand while placing the brooches in the flower? If so, then how do you wire the brooches to the flower stems? Do you place the bouquet down, wire, then continue? What about the placement of the wires? I’m thinking they all have to be on the outsides of the stems, or is there any room in between the stems for them to squeeze thru? Why do you need to wire in 2-3 places? Wouldn’t the wires be secured once the duct tape is wrapped, making 3 times overkill?
I’ve got about 80 brooches and I can’t imagine how many wires that would end up being! Could you just hold the flower stems, place the brooches in then wrap with wire (with another set of hands helping)?
Ok, that was more than a couple of questions. Sorry!
Thanks so much!
That is wonderful that you’re making a bouquet for your daughter, so special! Okay, so you can lay the bouquet down when you wire the individual brooch stems in so that you have two hands free. They can be inside and outside the flower stems, kind of woven through. I found that attaching it in 2-3 places was helpful so that it stays together as your assembling it, and because it gives you much more control over the placement of each stem than if you just wire it in one place. Please note that each brooch stem only need be wired to one small part of a single flower stem… you aren’t wrapping the wire around the entire base each time. If you feel that you can make it secure with less wire, use less wire! I do think you would find it difficult to achieve the precise placement you want if you wired all the brooch stems together at once. I hope that helps? I’m very happy to answer more questions if you have them, and I’d love to see a photo of your final bouquet!
That’s so helpful to know Johanna! I never thought about the fact it could actually be done with two free hands, but it makes perfect sense. Like you, I’ve been looking at lots of different how to’s and was getting a little overwhelmed. My daughter said she didn’t want any artificial flowers so I’ve been trying to figure out a way to do it without any. In order to do that, the brooches have to be really close together and you couldn’t see the beauty of them. I don’t think she realizes the flowers will come in handy for hiding the wires and really don’t show much at all, especially if using a lot of brooches.
The wedding is in June and I will probably put it on my blog (with a link back to you) at that time but I’m going to follow you on FB and if the spirit moves you maybe you can do the same and we can stalk each other ;).
Happy to help! Have you shown her pictures of brooch bouquets with the artificial flowers? I personally hate fake flowers, but loved my bouquet. They barely show at all, and really do a lot to fill out the bouquet and cover up any “bald spots” as the brooches shift. You have plenty of time to perfect it!
Yes, she’s seen pics with flowers and she isn’t a fan, but they’ve been mostly where you can see quite a bit of the flowers. I’m going to have to strike a balance between having the brooches stand out, yet not have too much flower show through. I hope to get to it tomorrow. The only thing that might stop me from finishing is I bought four fairly large hydrangea stems (one flower on each stem) and after reading your above comments I’m second guessing myself and wondering if it will be large enough. On the other hand I don’t want it to be too large because it can be too heavy. I will keep you posted. Thank you!
I am so grateful for this tutorial! about to make a start. are you stil available for questions?
You bet! Feel free to e-mail me johannaelsemore@gmail.com